Tuesday 29 April 2014

Bandits (Screen Print) Development Idea 2

I found it difficult to decide which idea to carry forward from the crit so decided to work on developing both ideas and then see which was the more effective design. To create a digital version of my drawing I scanned it then traced it in Illustrator to give it clean and editable lines so I could experiment further. 


I wanted this design to look clean and simple using block colours that would be appropriate for screen printing. 


Creating a vector image allowed me to scale the design as much as I wanted and choose different colours. I am still not sure however if  I will use this design over the other.


Wanted the pink to be quite vibrant when screen printing to make the poster stand out more. Screen printing also allows me to produce colours that I wouldn't be able to in digital print. 


Sunday 27 April 2014

Communication is a Virus: Anti Anti Gay Law

Presentation Feedback 

- Go with idea two, much stronger concept
- Consider colour, if we use pink then why?
- Name consideration, does it make sense? Include a fact? Number 84?
- Online alteration
- Use networks to make it go public
- Focus on DIY packs/sent with love packs
- Consider balloons
- What size envelopes? A4?


After establishing which idea to take forward we looked at existing charities and organisations and how they distribute their information. The majority, such as LGBT and Broken Rainbow direct people to their websites which they can provide links and detailed information. As a group we felt that the most direct and cheapest way of spreading awareness was to have everything centred on social network sites. 

To encourage people to like the FB and twitter pages we will give away packs filled with stickers, leaflets and a poster.


Elliott started designing the logo, as a group we thought a bold simple logo would work the best which clearly communicates the brand. We chose the third one however we asked around again for people to crit these logos and the general feedback we got was that they liked the arrangement of the first one but the third one made more sense and read in the way that we intended it to.

The logo was adapted after we gained this feedback into one that worked for both ways. Elliot kept the layout the same but changed the wording so that it fit much more comfortably and wasn't elongated too much vertically. 

Hot Dog


Jess designed the hot dog leaflet to go in the pack. It has been really well designed as there is a lot of information but it doesn't feel too overwhelming because it has been put into sections along the fold. 


Final poster created by Elliott, continuing with the theme of segregation he has used bars to show the separation of gay people, lateral connotations give much more depth and meaning and really create a striking overall brand.


Screen Print Poster

We wanted the pack to have items of value and high quality so we created a poster to screen print. This was also a low cost solution as I was able to print around 50 posters which we added to the packs and put up around the studio. There was a slight problem with the colour as I was in the print studio and didn't have a colour to reference to so the ink was more florescent then the rest of the items making it slightly inconsistent.   


Screen print positives were designed to fit the overall brand as our intention was to produce our own pack to send out. We decided to use statistics to gain peoples attention using the 84 countries enforce the law against gay marriage and propaganda as we weren't aware of this before our research and found it quite shocking. 


Social Media

As a group we thought the best way to promote The Anti Anti Gay Law was through social media. I setup the facebook page and began trying to get it active by contacting organisations through twitter and email that might want to help out. 


We got a great response with over 600 followers within a few days of the page being active. We could then send links encouraging people to support a charity by adding the websites links. 


People also contacted us through facebook's inbox asking for stickers. Unfortunately the stickers cost a fair amount to produce so we were only able to send a limited amount. If we were to make more we could ask for a small donation to help fund them. 


Tuesday 22 April 2014

OUGD404 Evaluation


BA (Hons.) GRAPHIC DESIGN
LEVEL
04
 Module Code 
OUGD404               


 Module Title
Design Principles


END OF MODULE SELF-EVALUATION

NAME
Jake Simmonds


1.  What skills have you developed through this module and how effectively do you think you have applied them?

I have developed skills in typography and type design from the start of the module where we looked at type categories and the characteristics the letterforms to type structure, anatomy, readability and legibility. I was able to learn a lot about these areas as I hadn’t previously been taught and the briefs throughout the module enabled me to put what I have learnt into practice.

Grid systems, type hierarchy and page layouts was also an area where I developed my skills. I found this section of the module to be useful in learning correct terminology, how grids can be used, the broad range of grid systems and how to effectively display information.    


2. What approaches to/methods of design production have you developed and how have they informed your design development process?

Experiment and practise. Start from sketching ideas in both layouts and typography through thumbnail sketches and repeat the process as much as you need to. This enabled my design work to have more variety and be more experimental which I could then narrow down to find the best result and develop digitally.


3. What strengths can you identify in your work and how have/will you capitalise on these?

I feel my final resolutions to the briefs have been a strong point as I have paid attention to detail and continued to develop them if there was anything I wasn’t happy with. I now have full understanding of the appropriate terminology regarding typography and grid and have been able to articulate these terms in my developmental stages on my blog.     


4. What weaknesses can you identify in your work and how will you address these in the future?

Time management could have been better throughout this module as I often left things for too long an as a result wasn’t able to spend enough time on them. This lead to my design development to be not as thorough which affected the final outcomes. I can address this problem in the future by timetabling projects, writing to do lists and identifying high priority tasks. 

Gain a better understanding of type hierarchies and how different fonts work for different situations will improve the standard of my work. I can address this by expanding my research practise using a lager variety of fonts instead of perusing the safer option.   


5. Identify five things that you will do differently next time and what do you expect to gain from doing these?

Blog immediately after each session as this will insure that no information is lost and my development can be mapped out more effectively.

More experimental sketches. This was a concept that was introduced fairly late to us in the module but now I have realised its importance and effectiveness I intend to use them more often and gain more variety in my work.

Don’t restrict myself to working in a certain way explore other options and do more independent research as this will further my understanding of design principles and allow me to be more confident in my work.


6.How would you grade yourself on the following areas:
(please indicate using an ‘x’) 

5= excellent, 4 = very good, 3 = good, 2 = average, 1 = poor

1
2
3
4
5
Attendance


x

Punctuality


x

Motivation


x

Commitment


x


Quantity of work produced


x


Quality of work produced


x

Contribution to the group


x

The evaluation of your work is an important part of the assessment criteria and represents a percentage of the overall grade. It is essential that you give yourself enough time to complete your written evaluation fully and with appropriate depth and level of self-reflection. If you have any questions relating to the self evaluation process speak to a member of staff as soon as possible.


Thursday 17 April 2014

OUGD404 Page Designs

After researching into existing publications such as The Independent Magazine and various books and zines from The Village Bookstore I decided a format I wanted to work on was B4. The research I had gathered were quite tex heavy and I didn't want them to feel over crowed as one of the main things I had found in layout design was the importance of space on a page to give the reader some structure to work with.    


A modular grid gave me more freedom to position the content in, above is what I decided to use. 8 columns on a double page spread split into 6 equal rows and larger margins at the top and bottom of the page. 


I allow the spreads to work together and have some consistency I decided to use a hang line leaving some space at the top for page numbers and a title running throughout the 10 spreads.  


Using the thumbnail sketching technique allowed me to quickly generate layouts and could then see which were the most successful.    


My pages used the same 4 sections of content: Main title, subheading/quote, body text and images. Again this enabled me to be experimental with positioning the content to keep it interesting but have a consistent theme throughout.  

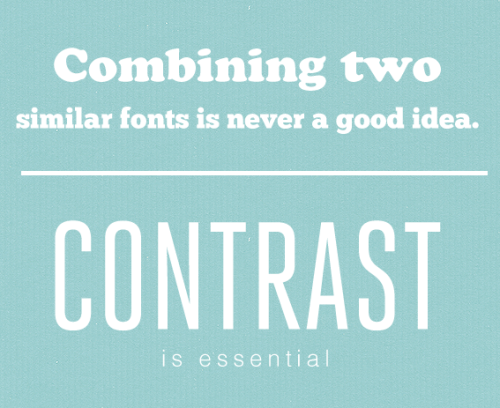
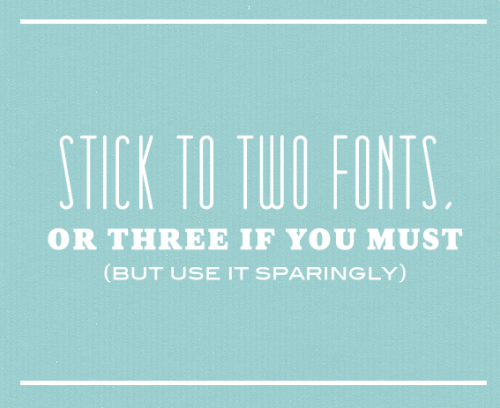
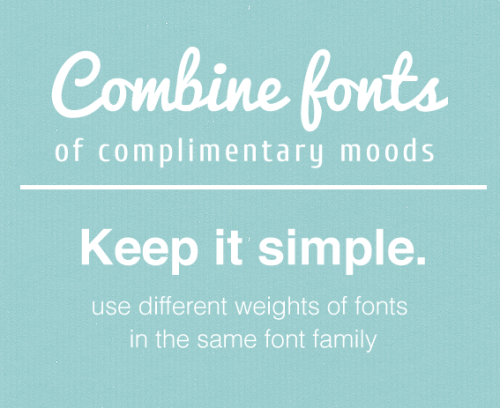
As this was my first attempt at creating a publication with a large amount of content I feel I have been fairly successful. The information has been clearly presented and is straight forward to read. The choices in fonts used have been justified by the research I have carried out. There are also a lot of things things I would have liked to change about the designs if I had more time. I would have liked to experiment with colour and different images and also to have been more experimental with the body text as I have chosen to keep it in narrow multi-columns, which looking back now, probably wasn't the most effective way of organising the text as I had to deal with pages which had large amounts of text and the columns affected readability.      

Wednesday 16 April 2014

OUGD404 Serif vs Sans-serif

Serifs are used to guide the horizontal “flow” of the eyes; The lack of serifs is said to contribute to a vertical stress in sans serifs, which is supposed to compete with the horizontal flow of reading· Serifs are used to increase spacing between letters and words to aid legibility· Serifs are used to increase contrast (and irregularity) between different letters to improve identification
Arguments in favor of sans serif typefaces· Sans serifs are better on the web· Sans serif is better at small sizes. Sans serif fonts survive reproduction and smearing because of their simple forms. Sans serif is better for children learning to read.


I also found an informative series of posters which showed good examples regarding 
combining serif and san-serif and how to effectively use them. 


http://visualgraphc.com/post/68889469714/fonts


Tuesday 15 April 2014

Artist Research (Screen Print)

Ken Taylor 


Ken Taylor hand draws his images before vectorising them and separating the colours. What inspires me about his work is the level of detail in his prints and the carefully thought out colour separation. 

Midnight Marauder


The simplicity in Midnight Marauders work is something that I can really take from looking at his poster designs. The films mood is captured by using a still from the film but then edited to turn it into his distinctive gritty style. The typography is always appropriate to the film it is used for whether it is a action film, horror or comedy. 


Thursday 10 April 2014

OUGD404 What is a Book (Process)

Grid: The grid system in graphic design is a way of organising content on a page, using any combination of margins, guides, rows and columns. It is commonly seen in newspaper and magazine layout with columns of text and images. One grid, or a collection of grids, may be used across an entire project to achieve a consistent look and feel. In a finished product, the grid is invisible, but following it helps in creating successful print and web layouts.

Columns: Some software may have special dialog boxes for setting up pre-set or custom columns with gutters. Non-printing column guides can be placed on master or publication pages. Normally all pages begin with a single column — the space between the margins. With multiple columns, a pair of vertical guides that move together mark gutters oralley between columns. Column guides control the flow of text within columns, keeping it out of the gutters.


Gutters: The margin space available along the binding edge.

Drop Caps: Decorative initial caps (capital letters) at the start of a paragraph that drop into a space created within the first few lines of the text are dropped caps, also written as drop caps. As with any initial cap, the size and placement of this letter is designed to draw readers into the narrative. The common term dropped caps or drop caps for all initial caps is actually a specific style or placement. Adjacent caps and raised caps are two specific styles or placement of initial caps.


Imposition: Imposition is one of the fundamental steps in the prepress printing process. It consists in the arrangement of the printed product’s pages on the printer’s sheet, in order to obtain faster printing, simplify binding and reduce paper waste.Correct imposition minimizes printing time by maximizing the number of pages per impression, reducing cost of press time and materials. To achieve this, the printed sheet must be filled as fully as possible

Folio Numbers: There were loads of meanings to the word folio that all have to do with paper size or pages in a book. Some common meanings are described below with links to even more details. A sheet of paper folded in half is a folio. Each half of the folio is a leaf; therefore a single folio would have 4 pages (2 each side of a leaf). Several folios placed one inside the other create a signature. A single signature is a booklet or small book. Multiple signatures make a traditional book.

Pagination:  is the process of dividing (content) into discrete pages, either electronic pages or printed pages. Today the latter are usually simply instances of the former that have been outputted to a printing device, such as a desktop printer or a modern printing press. For example, printed books and magazines are created first as electronic files and then printed. Pagination encompasses rules and algorithms for deciding where page breaks will fall, which depends on semantic or cultural senses of which content belongs on the same page with related content and thus should not fall to another (e.g., widows and orphans). Pagination is sometimes a part of page layout, and other times is merely a process of arbitrary fragmentation. The difference is in the degree of intelligence that is required to produce an output that the users deem acceptable or desirable. Before the rise of information technology (IT), pagination was a manual process, and print output was its sole purpose. Every instance of a pagination decision was made by a human. Today, most instances are made by machines, although humans often override particular decisions (such as by inserting a hard page break). As years go by, software developers continually refine the programs to increase the quality of the machine-made decisions (make them "smarter") so that the need for manual overrides becomes increasingly rare.